Mouse PI For Hire: Bandel's Laboratory walkthrough
Summary
Looking for a full walkthrough of Bandel's Laboratory in Mouse: PI For Hire? The bulk of your work so far in Mouse: PI For Hire has been to figure out what happened to the missing magician, Steve Bandel. This investigation now takes Jack Pepper to Bandel's mansion, after hearing that he apparently kept a secret underground laboratory there.
Bandel's Laboratory ups the ante considerably. While Gumshoe In The Opera pitted you against your first boss, this main job pits you against no fewer than three bosses - and a whole host of other devious rooms filled with traps and enemies galore.
With all the excitement, it can be tricky to keep track of exactly where you've been, and where to find all those hidden areas and secret collectibles strewn about the level. But fear not, my hard-boiled mouse! Below you can follow along with our full 100% walkthrough of Bandel's Laboratory in Mouse: PI For Hire!
Want the walkthrough for a different area or level of the game? Check out our full Mouse: PI For Hire walkthrough hub!
Bandel's Laboratory walkthrough
The Stage Designer's tip from the last mission leads you to Bandel's hidden laboratory, where you'll discover a rather darker side to the magician's exploits... Expect plenty of secrets, not to mention a number of new enemy types and multiple bosses to defeat. So let's get started!
Collectibles and Secrets:
- 5x Secrets
- 4x Newspapers
- 2x Comic Books
Bandel's Laboratory walkthrough steps:
- Head to Bandel's Secret Lab.
- Take the elevator down to Bandel's lab.
- Search the lab complex (Secrets 1-2).
- Obtain the Devarnisher.
- Explore the room with the giant robot head (Secret 3).
- Defeat Robo-Betty.
- Speak with Igorrr.
- Crank up the projector's power.
- Defeat the second Robo-Betty.
- Investigate the "secret" secret lab (Secrets 4-5).
- Defeat the third Robo-Betty (Secret 6).
- Speak with Wanda and Tammy.
- Upgrade your weapons.
- Pin your clues and talk to Stilton.
1. Head to Bandel's Secret Lab.

Image credit: Rock Paper Shotgun/PlaySide
First up, after speaking with Cornelius Stilton and obtaining the address you need, you actually have to get to Bandel's mansion and his secret lab. Head to your car and interact with it, then drive to the newly unlocked area far to the east.
2. Take the elevator down to Bandel's lab.
Bandel's Laboratory begins fairly simply. Follow the spooky main path and double jump across the first gap. At the other side you'll be attacked from a nearby upper platform by some strange cultist enemies.


Image credit: Rock Paper Shotgun/PlaySide
Head up to that ledge and break the wooden boxes for some coins, then turn around and jump across the gap. Turn right and head to the door at the end of the path, which opens into a hidden elevator. Flick the lever to head down into the lab.


Image credit: Rock Paper Shotgun/PlaySide
3. Search the lab complex (Secrets 1-2).
Save at the Typewriter, then head left and explore every nook and cranny for Cash. After that, head right into the next room, and defeat the enemies that spawn.
One of these enemies is a new type, holding a large tower shield in front of them. Bait them into attacking by moving up close to them, and shotgun them in the face to kill them.


Image credit: Rock Paper Shotgun/PlaySide
Ahead is a corridor, with an electrical barrier across a doorway to your right. Follow the cable trailing along the corridor floor; it'll lead you to a switch. Flick it to turn off the electric barrier. Head through the barrier and kill the enemies in front of you.
You can head to the far end to pick up the health and D-namite if you like, but the actual way forward is to drop onto the top of the train to your right. Drop down onto the right side of the train, and then head into the east carriage to find a Secret area containing a Safe with 30x Cash inside.


Image credit: Rock Paper Shotgun/PlaySide

Image credit: Rock Paper Shotgun/PlaySide
Proceed into the room beside the train, and head up the ladder to reach your next Typewriter checkpoint. Before you go any further, check the wall to the left of the Typewriter for a Schematic! You'll very shortly be able to use these Schematics you've been collecting to start upgrading your weapons.
You can also hop over the barrels and boxes to the immediate left of the Typewriter for a tiny Secret area containing a sum total of 14x Cash.
4. Obtain the Devarnisher.

Image credit: Rock Paper Shotgun/PlaySide
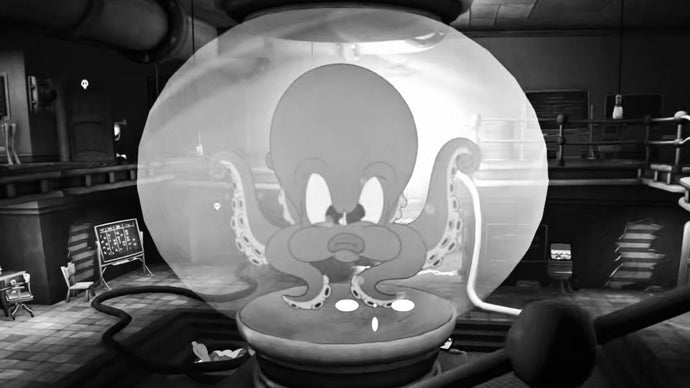
In the next room, you'll find... well, there's no other way to say this: a giant angry octopus in a jar. More importantly, you'll be attacked by more enemies, but your Micer and Boomstick are more than enough for them, especially with that flame barrel at the base of the octopus, ready for shooting.
Head up the stairs and jump the gap, then head through the doorway to your right. In this room you'll find three things of note. The first is a diary entry on the table to your right, in which Bandel talks about "rebuilding" his dead assistant, Betty. Secondly, on the opposite wall, you'll find a Newspaper collectible.


Image credit: Rock Paper Shotgun/PlaySide
Now return to the table in the centre of the room and push the big button. This will turn off the strange technological contraption ahead of you, allowing you to walk up to its central compartment and obtain a brand new weapon: the Devarnisher.


Image credit: Rock Paper Shotgun/PlaySide
Head back out into the previous room, where several more enemies will have spawned. This is a great time to try out the Devarnisher. The key to this weapon is that it deals low damage on impact, but very high damage over time - and, crucially, that damage over time does not stack. So, just shoot the enemy once and move on. Once they've stopped melting, shoot them again if need be, but it's likely they'll already be dead.

Image credit: Rock Paper Shotgun/PlaySide
5. Explore the room with the giant robot head (Secret 3).
Once all enemies are dealt with, head into the north side room and around the corner to the right. Flick the switch to turn off all the electrical barriers in the room.


Image credit: Rock Paper Shotgun/PlaySide
You can then head into the east side passage. There's a load of Cash to be collected beside the lockers at the end of the walkway, after which you should ascend the steps into the next arena. Along the way, you can read a sign on the wall which introduces you to the Pepper-D status effect - we'll come to this shortly.
As you enter the next room, some sort of strange giant robot head with a projector on it will turn off, and you'll have to turn it back on again. First, kill the enemies in the room. Directly ahead of you as you enter the room is a Pepper-D pickup, which will give you increased movement speed and damage, as well as fire damage added to all your attacks. Use it, and enjoy the carnage.

Image credit: Rock Paper Shotgun/PlaySide
Once you've killed them all, take a closer look below the steps in the centre of the room. Crawling underneath you'll find a Secret area containing some Cash and Devarnisher ammo.
Once that's done, head up the stairs to the raised platform on the south side of the room, and head through the door at the far end.
6. Defeat Robo-Betty.

Image credit: Rock Paper Shotgun/PlaySide
As you walk into the next room, a short cutscene will play which introduces a new miniboss - a robotic reanimation of Betty, Bandel's slain assistant. Fortunately, this recreation is rather haphazard.
The Robo-Betty has two attacks: the first projects two lasers to either side, which she then spins around, forcing you to jump over them as you fight her. The second attack is a targeted beam which locks onto you. To avoid damage, hide behind one of the glass walls which appears specifically during that attack.


Image credit: Rock Paper Shotgun/PlaySide
As Robo-Betty loses health, her side lasers will grow more dangerous, beginning to rotate and slant in ways that make it much less predictable to dodge them. It's best to stay at a distance during this phase, and pepper her with either your Micer or the Devarnisher until she expires.
7. Speak with Igorrr.
Once Robo-Betty is defeated, explore the room thoroughly for Cash and other pickups. On the far side of the room, at ground level, there's a small study area where you can find a Newspaper collectible on the desk next to the microscope, and a Schematic on the table opposite.


Image credit: Rock Paper Shotgun/PlaySide
Now climb above this study area onto the platform above, and flick the lever to open the cage suspended in the air, containing a rather unusual-looking NPC. Speak with this character - named Igorrr - for some more information on Bandel and his Robo-Betty obsession.

Image credit: Rock Paper Shotgun/PlaySide
8. Crank up the projector's power.
Once you've finished speaking with Igorrr, head through the south exit and follow this path into a new room, where you're given the objective to "Crank up the projector's power".
Kill the couple of enemies that spawn in this room, and make your way up the stairs at the far end, and flick the switch on the upper floor. This will move a platform into place outside, so you can cross to the upper level on the opposite side of the room.

Image credit: Rock Paper Shotgun/PlaySide
Before you cross to the other side, however, shoot the explosive barrel by the wall next to you, and enter this side passage to reach another lever. Pull this lever to remove the electrical barrier from the other side. There's also another torn diary entry in this room from Bandel, which you can read if you like.


Image credit: Rock Paper Shotgun/PlaySide
Now cross to the far side of the room, and kill the lone enemy that spawns there. Head to the right first, and you'll find a Safe in the adjacent room, which you can tailpick for a hefty 60x Cash.


Image credit: Rock Paper Shotgun/PlaySide

Image credit: Rock Paper Shotgun/PlaySide
Then head through the left way and up the ladder. Save your game at the Typewriter, and pull the lever next to the locked door to crank up the projector's power.
Before you leave, tailpick the locked door and search the room beyond for a Comic Book collectible, and another torn diary page about "Building Betty".


Image credit: Rock Paper Shotgun/PlaySide
9. Defeat the second Robo-Betty.
Backtrack to the projector room with the giant robot head, and approach said head. As you near, the mouth will open and another Robo-Betty will appear, this one more advanced than the first (albeit without a head).


Image credit: Rock Paper Shotgun/PlaySide
This Robo-Betty has an entirely different playstyle to the first one. It will charge at you relentlessly, and also throw bombs on the ground to try and limit your movement and cause damage if you're not careful where you step.
The good news is that you can use these bombs to your advantage. Shoot them while Robo-Betty is near them to deal tonnes of easy damage, and make the fight much shorter.

Image credit: Rock Paper Shotgun/PlaySide
Your Boomstick is your ideal partner in this fight, as it takes advantage of Robo-Betty's aggression (she's always trying to close the distance between you), and also knocks her back to give you more breathing room when you need it. I actually find this Betty to be easier than the first one.
Once Robo-Betty #2 is defeated, head through the mouth of the giant robot head, save your game at the Typewriter, and flick the switch to descend in another elevator - although you'll end up descending rather quicker than anticipated.


Image credit: Rock Paper Shotgun/PlaySide
10. Investigate the "secret" secret lab (Secrets 4-5).
You're now in the "secret" secret lab beneath Bandel's mansion. More robot enemies await you here, although these ones aren't nearly as tough as the Betty lookalikes.
Hug the left-hand wall and hop across the upper platforms to the other side. Drop down onto the floating platform below, in the north corner of the room. Flick the lever on the wall, and then hop across the floating platforms back to the start of the room again (killing any enemies that appear along the way).


Image credit: Rock Paper Shotgun/PlaySide

Image credit: Rock Paper Shotgun/PlaySide
Now hop across the upper platforms again, and you'll find you can now get to the other side of the gate at the far end, via a ladder downwards.
Head into the room to your right, and flick the switch on the panel by the window. Save your game at the Typewriter, and tailpick the locked door in the room for a Secret area containing a Comic Book.


Image credit: Rock Paper Shotgun/PlaySide
Use the ladder to get back into the main room and hop across to the centre, killing more enemies along the way. Then look to the southwest and you'll see a doorway you can double-jump over to from this central platform.

Image credit: Rock Paper Shotgun/PlaySide
Hop across the tops of the half-submerged cubicles ahead of you until you reach solid ground again, and then wait for the door in front of you to open. There's some Cash to your right, but otherwise just keep surging straight ahead, along the tilted walkway to the other side. Turn right, and jump across again over the second tilted walkway.


Image credit: Rock Paper Shotgun/PlaySide
At the far end, you'll find a bounce pad which you can use to reach the higher levels of this room. More robot enemies will attack you, including a robotic sharpshooter who you should take care of quickly before he deals you much damage.
Jump over to the far side again and press the button on the wall. This will lower an elevator-platform which you can then stand on to rise upwards and reach the walkway above.

Image credit: Rock Paper Shotgun/PlaySide
But before going through the next doorway, turn 180 degrees and jump across to the nearby platform in the centre. From here, you can reach another platform to your left which acts as a Secret area containing a Schematic and 20x Cash.


Image credit: Rock Paper Shotgun/PlaySide
Now backtrack and head through the door above the elevator-platform.
11. Defeat the third Robo-Betty (Secret 6).
Save at the Typewriter, and then check the left-hand room first for some extra Cash. Then, check the bin to the right of the right-hand doorway, and you'll find an easily missed Newspaper collectible.

Image credit: Rock Paper Shotgun/PlaySide
Next, head down the stairs BUT don't head into the main room yet! Instead, look under the steps you just came down, and you'll find one final Secret area. This Secret contains a bunch of Cash and a black Safe. Here's the solution:


Image credit: Rock Paper Shotgun/PlaySide
Alright, now it's time to enter the final boss arena, where you'll come up against the third and final (and most advanced) form of Robo-Betty, combining aspects of both the previous Robo-Betty movesets. Bandel has a lot to answer for.

Image credit: Rock Paper Shotgun/PlaySide
This Robo-Betty also emits spinning laser attacks like the first Robo-Betty, but in four directions instead of two, giving you less time to dodge. Thankfully, she also inherits the big weakness of the second Robo-Betty: she throws out loads of bombs which you can shoot to damage her instead.
The other big strategy for this fight is: when Robo-Betty starts to charge up her gamma ray (she'll tell you about it with a quip when she does), one of the buttons on the wall around you will become pressable. Press it in time, and Robo-Betty will be shocked, stunning her and dealing a decent chunk of damage.

Image credit: Rock Paper Shotgun/PlaySide


Image credit: Rock Paper Shotgun/PlaySide
Once Robo-Betty is finally slain, head up the steps and inspect the beautifully presented Coast Guard Arrival Card for an all-important clue for your Crime Board back home.

Image credit: Rock Paper Shotgun/PlaySide
Finally, all that's left is to head to the east side of the room. A doorway has opened up, and behind it is a "Quit-o-Phone". Interact with it to end the level and drive back to your office.

Image credit: Rock Paper Shotgun/PlaySide
12. Speak with Wanda and Tammy.
Back home, head straight to see Wanda in the bar - she's in her usual spot. Fill her in on what you've found, then exit out into the street near your office building, and you should find a paperboy at the end of the street to the east. Purchase a Newspaper from him for 15x Cash.


Image credit: Rock Paper Shotgun/PlaySide
Before heading into your office, head to the alleyway next to the ammo shop, where you'd usually find Tammy. She's not there, but there's a note on the wall you can read.


Image credit: Rock Paper Shotgun/PlaySide
Tammy's shop is finally open, so head to the end of the alleyway and through the door to find it. Speak with Tammy to hear about how you can use your Schematics to upgrade your weapons - and then interact with the table next to her to do exactly that!
Upgrade your weapons.

Image credit: Rock Paper Shotgun/PlaySide
There are two things to remember about upgrading your weapons in Mouse: PI For Hire:
- Each successive upgrade to a weapon costs more Schematics (1-3-5).
- The first upgrade to any weapon unlocks its unique "alt-fire" mode.
This being the case, it's best to unlock the first tier upgrade for each of the three weapons you own so far (Micer, Boomstick, and Devarnisher). But after that, I recommend you fully upgrade the Micer. Each upgrade increases its damage and mag size, and turns the Micer into a phenomenally reliable weapon at all ranges - and one which you don't need to reload every two seconds anymore.
14. Pin your clues and talk to Stilton.
Once you've finished upgrading your weapons, all that's left is to enter your office. Interact with the Crime Board and pin your clues there, and then speak with Stilton, who's found his way into your office and has been waiting for you.

Image credit: Rock Paper Shotgun/PlaySide
Stilton will set you on the path of your next case - or is it the same case, just a different aspect of it? Either way, if you want to continue your playthrough ensuring you don't miss a single secret or collectible along the way, look no further than our Mouse: PI For Hire walkthrough for A Bit Of A Scene, your next main job!